Moody 376
“:We have used in on various passages between Gibraltar and here in the Canaries, via the Algarve and Madeira, and found it to work well in a variety of conditions, from handling gusts and squalls, to steering us downwind in light airs. We would certainly recommend the Hydrovane to anyone looking to install a wind vane on our boat like ours.
However, the installation itself we found extremely challenging and frustrating, taking the two of us seven long days.”
From: Alex Mansfield <a.p.mansfield@gmail.com>
Sent: Friday, November 22, 2019 5:54 AM
To: John Curry; Will Curry; Sara Curry
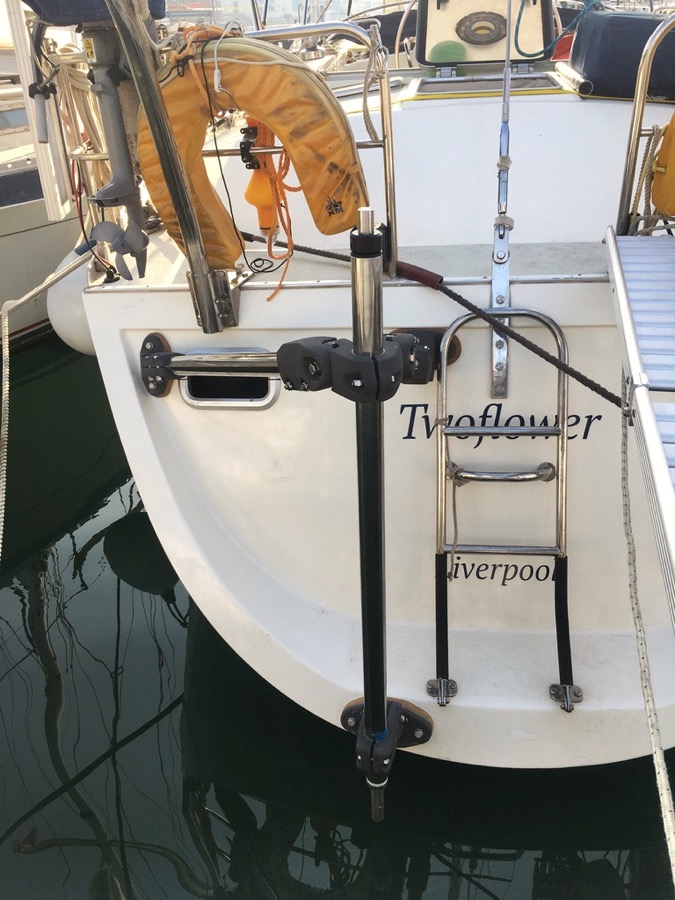
Subject: Hydrovane performance and installation on Moody 376 Twoflower
Dear Hydrovane team,
It’s been a few months now since we installed our Hydrovane, which has given us some time to test its performance on our Moody 376. And we can say that we are very happy with the performance and usability of the Hydrovane.
We have used in on various passages between Gibraltar and here in the Canaries, via the Algarve and Madeira, and found it to work well in a variety of conditions, from handling gusts and squalls, to steering us downwind in light airs. We would certainly recommend the Hydrovane to anyone looking to install a wind vane on our boat like ours.
However, the installation itself we found extremely challenging and frustrating, taking the two of us seven long days. We would like to share with you some of the difficulties we faced along with some feedback that we hope could make the experience easier for other Hydrovane customers in the future.
Problems during installation
We found that there were more constraints in the ways that the joints could move than we had realised from the materials we had read in advance – for example, the constraints on the angles that the joints can rotate through. These constraints eliminated a lot of the ideas about how to mount it – in fact we realised there are only a couple of possible ways a Hydrovane could be mounted without changing the original fittings. This left us mounting in one of the ways used by a Moody 376 before in the proposal you sent us. Some diagrams, animations or videos showing these constraints might have helped us have better ideas and get our expectations right from the start.
The above is important because it also affects the parts that are actually needed for mounting. In our case, even though we mounted the unit in the same ways as illustrated in the proposal, we still found that two of the parts we bought from you were not the right size.
Firstly, the H bracket pad was not thick enough to make the wedge shape required to get the shaft vertical given the constraints of the H bracket itself and the shape of our hull. We would have required at least a 35mm thick pad.
Secondly, we needed one longer strut for the A bracket, of 88cm i.e. 8cm longer than the shipped 80cm. Given that we ended up mounting the unit in the same way as shown in the proposal (and on several other Moody 376s we have encountered), we would have thought you would have been able to inform us or at least double check with us about these sizes in advance.
To bring that all together, without guidance from you and without knowing about the constraints, I’m not sure how we ourselves would have anticipated these problems before ordering the parts from you. Perhaps for future preference you can make a note of these issues in case you are preparing an order for another Moody 376 or similar boat?
Finally, the teak pads you supplied already had holes drilled for the bolts. However these holes were not perpendicular to the surface of the pads, and the spacing between the holes did not match the spacing of the bracket castings. This caused us a number of headaches – in particular, as we used the actual brackets and mounting pads to guide us drilling the holes through our hull, this alignment caused us to drill holes at the wrong angle
Surely it is possible to improve the drilling of these holes? Otherwise we believe it would be best to leave the pads without any holes drilled to prevent any confusion.
Ideas for installation
Overall our installation was quite challenging because we also had to deal with shaping the outside pads in very tight spaces and filling the very uneven interior surface of the hull. However we found some techniques that worked well for us that we thought might be interesting to share with you too (see also the attached photos).
In order to shape the pads to the hull, we extended the idea you give in the installation guide of ‘holy-stoning’ the pad onto a piece of sandpaper stuck against the hull. We attached the pad to a palm sander using double sided tape and a large piece of velcro. Using this and pressing against some very coarse sandpaper on the hull made short work of shaping the pads, even in very tight corners with barely any space to move the pad. Despite many people saying that shaping the pads is one of the most time consuming aspects, with this method, this took no time at all!
In order to get flat, perpendicular surfaces for the backing plates on the inside, we used a filling compound and moulded it using the actual backing plate and cheap sacrificial bolts. In order to keep these clean from the filling compound, we covered the back of the backing plate with grease and a sheet of cling film, and wrapped the sacrificial bolts in PTFE tape. We then applied the filling compound and bolted everything in place. Once it was cured, and in no rush, we could still easily remove everything and clean off the PTFE tape and cling film to get a good finish.
Overall then, we thank you again for making this great product and for being so responsive and supportive, and we hope that with our feedback you can improve the experience still further for future customers. For us, we look forward to many miles ahead under sail and Hydrovane.
Best regards,
Alex & Angie
SY Twoflower (Moody 376) in Tazacorte, La Palma