Caliber 40 LRC - installation
“This job took a total of a day and a half spread over three and a half days waiting one day for larger bolts and losing one day to weather… Had we used Teak it would likely have taken about 6-8 hrs.”
From: Jeffrey Kornblum
Sent: July-01-09 8:46 PM
To: ‘Will Curry’
Subject: Caliber 40 LRC
Will,
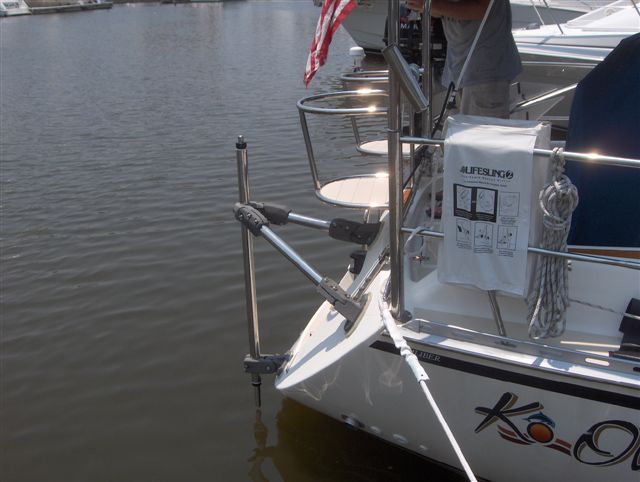
My son and I installed the hydrovane last week and I wanted to share these pictures with you. As an amateur I would like to offer some suggestions for others who want to do this project on their own. The off center installation is ideal for this boat. My swim ladder is intact.
We built a dam with a tarp as you can see in the picture. We were lucky not to drop anything and had all components secured with a line. Nevertheless I was worried about dropping tools and bolts that would not be easily replaced. Working from the dinghy simplified the job and since we tied it from both ends it was a good platform.
I purchased all my hardware as 316 SS. This was special order and one of the holes had thicker fiberglass such that I needed a longer bolt. To get the job done we overnighted a pack of 3″ bolts. I had overbought in case I dropped something but didn’t buy two sizes to cover this potential problem. Those these bolts are relatively expensive they are cheap compared to the cost of the project and I would advise having a few extra bolts of different sizes on hand.
Instead of backfilling the backing plates we mixed the fiberglass with high density filler to make a peanut butter texture (suggested by Cory at Triton Marine) which applied easily and squeezed out nicely and neatly leaving a complete fill behind the plates.
We taped out the hull and bracket feet and also applied high temperature grease to the bolt head and wrenches before tightening down which simplified cleanup.
The post is to be vertical, however that is assuming the boat is not listing. A small breeze results in a small list of the ship. I put a level at several locations along the centerline of the boat and they were all different. We ended up using the levels near the stern and made certain the post had the same level as the boat. Standing on the stern even for a 16000 lb boat makes a difference with the list when you are trying for perfection. Looking from afar the post has the same alignment as the mast though up close when you are working on it you can’t make this assessment. Vertical alignment also not exact. The CG of the boat varies with load and load placement and therefore the transom squat also varies. In the Caliber when under power there is enough squat that water is up on the lower transom step and obviously will cover the H-Bracket. Under sail the degree of squat and vertical alignment is going to vary with how full your tanks are when you install vs when you sail as well as how much weight in provisioning you add. Hopefully when we are loaded for cruise and anchoring out the pole will still be above the water.
We used G-10 for the timber pads which are rock hard and long lasting.
You can cut three timber pads from one 12X12 sheet. We cut the templates and drilled their holes at home. At the boat we sanded them using the technique of 60 grit on the hull with double sided tape. This took many hours by hand to get a flush fit. Tape a block of wood to the timber pad with double sided tape to give a good mechanical advantage on the timber pad and preserve your fingers from the sand paper. Teak would have cost about the same and would have sanded in about 10 minutes. Once done the G-10 obviously will not require further maintenance.
Nylocks are nice but can still loosen over time and stress. All of the bolts on my plane have a heat stable wax line over the bolt/nut interface that immediately shows if there has been any loosening. I am applying the same thing on these bolts for easy inspection particularly in the lazarette.
The instructions spoke of using 2 inch PVC as a template. The SS tubes are 2 inch outer diameter. I have both 2 inch and 1.5 inch PVC neither of which worked. Two inch PVC has a two inch inner diameter and 2 3/8 outer diameter. This was too big even with the plastic sleeve removed from the brackets. The 1.5 inch PVC has a 1 7/8 inch outer diameter which was too small even with the plastic sleeves. We jury rigged the PVC to get accurate measurements before cutting the SS pipes.
This job took a total of a day and a half spread over three and a half days waiting one day for larger bolts and losing one day to weather.Over half the work time was in sanding the G-10. Two people are a must and when aligning the pole, three would have been nice. Had we used Teak it would likely have taken about 6-8 hrs.
I will be on the boat in August for three weeks and look forward to running trials on the hydrovane. I am happy to talk with anyone who wants to do this job on their own. I will drop you a line in late August.
Regards,
Jeffrey Kornblum, MD
S/V Ko Olina